Scroll through social media for ten minutes and you'll see hair transplant before and after photos that look almost impossible. They're carefully lit, freshly styled, often filtered, and almost never representative. In international patient surveys, a significant minority of people who go ahead with surgery later say the result didn't match the photos they had pinned in their minds, particularly after traveling to popular destinations like Istanbul, Turkey.
This guide turns marketing promises into honest counseling you can actually use. We'll look at what hair transplant before and after realistic results look like over time, for different balding patterns, and how to judge photos with a critical eye, drawing on first-hand experience from a high-volume Istanbul clinic.
What Realistic Hair Transplant Results Look Like
A realistic hair transplant result is a natural-looking hairline and visibly fuller areas of previous thinning, achieved over 12–18 months, with some remaining thin spots because the surgery redistributes your existing hair rather than creating new hair.
In practice, a realistic outcome usually means:
- ● A natural-looking hairline appropriate for your age and facial proportions.
- ● Noticeably better hair density / coverage in treated areas, especially the frontal area and mid-scalp.
- ● Some visible scalp in bright light or when hair is very short or wet.
- ● Hair you can style more freely, although many people still like volumizing products or strategic cuts.
According to the International Society of Hair Restoration Surgery (ISHRS) patient education materials, transplanted hairs typically start growing at around 3–4 months and reach most of their visible result by about 12 months, with further refinement up to 18 months. These are realistic hair transplant results, not the Instagram-perfect transformations you often see in ads.
Your pattern of male pattern baldness (often described with the Norwood scale), donor area quality, hair type, and the skill of your hair transplant surgeon all shape your final look. Next, we'll explain how a transplant actually changes your hair and why donor limits matter.
How Hair Transplants Actually Change Your Hair: The Basics
A hair transplant works by moving permanent hair follicles from the donor area at the back and sides of your head into thinning or bald areas, where they continue to grow like they did in their original location.
A hair transplant does not create new hair; it redistributes follicles that are genetically resistant to balding. These follicles come from the occipital and parietal scalp (back and sides), which usually stays dense even as the top thins. The American Academy of Dermatology (AAD) notes that this resistance is largely due to lower sensitivity to DHT (dihydrotestosterone), the hormone driving androgenetic alopecia in many men and women.
Each follicle is moved as a follicular unit, a natural bundle of 1–4 hairs with its supporting structures. Your surgeon creates tiny recipient sites in the thinning area and places these units at specific angles and densities to create an illusion of density. Think of it like arranging pixels in a digital image: you don't have more pixels overall, but you can place them where they matter most so the picture looks fuller.
In our experience at Medart Hair Transplant, the patients who are happiest are those who understand this redistribution concept clearly from the start. They go into surgery with a realistic expectation that their new hair will improve framing and coverage, not erase baldness everywhere.
Get a Free Hair Analysis
Talk to an experienced patient coordinator for your hair transplant in Turkey.FUE vs FUT: Does the Method Change My Final Look?
FUE and FUT are the two main ways to harvest grafts from the donor area, and they differ more in scarring pattern and recovery than in the appearance of the transplanted hair itself.
● FUE (Follicular Unit Extraction) removes individual follicular units using tiny punches, leaving many small dot scars spread across the donor area.
● FUT (Follicular Unit Transplantation / strip surgery) removes a narrow strip of scalp from the back, which is dissected into follicular units, leaving one longer linear scar.
Both methods can produce excellent real hair transplant before and after results when performed by an experienced hair transplant clinic. The transplanted hairs grow the same way because they come from the same permanent donor zone. The NHS and ISHRS describe the main visible differences as:
Aspect |
FUE |
FUT |
|---|---|---|
Donor scar type |
Multiple small dot scars |
Single linear scar |
Short-hair styling |
Dots are easier to hide with short hair |
Linear scar may show with very short cuts |
Graft numbers |
Similar in one session for many patients |
Sometimes slightly higher in some scalps |
Recovery sensation |
Mild donor soreness, scattered |
Tightness along strip incision |
Scar visibility depends on your healing, hairstyle, and how conservatively the donor was used. With both methods, long-term donor management is crucial so you don't end up with visible thinning or overharvesting at the back.
Donor Area Limits: Why You Can't Cover Everything at High Density
The donor area / donor density is like a bank account: you can only spend what you have, and if you overspend early, you have nothing left later.
Non-balding scalp can have around 60–100 follicular units per cm². In a transplant, many surgeons aim for about 30–40 grafts per cm² in the frontal zone to create good coverage, which is lower than natural density but often enough for an illusion of density. This approach is consistent with targets discussed in ISHRS teaching materials and peer-reviewed hair restoration literature.
If you are a Norwood 6–7 (extensive baldness), there is simply not enough permanent donor hair to recreate teenage-level density over the entire scalp. The surgeon must prioritize:
- ● Hairline design and frontal third to frame your face.
- ● Mid-scalp to blend front and back.
- ● Crown/vertex only if donor reserves allow, usually at lower density.
Overharvesting means removing so many grafts from the donor zone that it becomes visibly thin or patchy, even when hair is grown out. Hair transplant failure means a significant number of transplanted grafts do not survive or grow properly, leaving weak coverage despite using many grafts.
In our experience at Medart, many disappointing cases we see for revision / repair hair transplant involve clinics that promised "full coverage" everywhere in one session, used excessive grafts in the crown, and left the donor area depleted.
Because of these limits, hair transplant before and after realistic results always involve trade-offs. To understand those trade-offs fully, it helps to know how the appearance of your scalp changes over time.
The Hair Transplant Timeline: Before and After by Month
Most patients see little to no cosmetic improvement in the first three months after a hair transplant, then progressive thickening between 4 and 12 months, with final refinement taking up to 18 months.
The hair growth cycle explains this delay. Transplanted hairs often enter a resting (telogen) phase, shed, then slowly re-enter growth (anagen). Educational material from the ISHRS and peer-reviewed dermatology reviews describe a typical curve where many transplanted hairs become visible between 6 and 12 months, with maturity continuing after that.
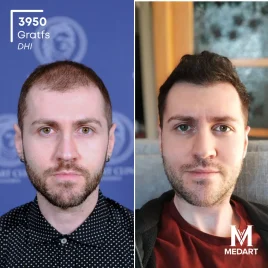
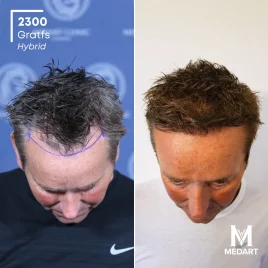
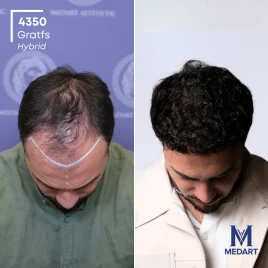
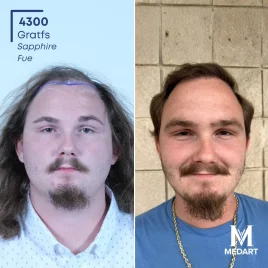
Here is what the average hair transplant timeline results look like in daily life.
Before Photos: What a "Good" Candidate Looks Like
A good "before" photo set usually shows:
- ● A clear Norwood scale pattern of male pattern baldness.
- ● Adequate donor density in the back and sides.
- ● Stable or medically managed hair loss with finasteride and/or minoxidil, where appropriate.
A dermatologist or trichologist often helps confirm the diagnosis and rule out other hair loss conditions, such as scarring alopecias, which are managed differently. The AAD notes that medications like finasteride and minoxidil can slow ongoing loss, which matters because a transplant doesn't stop future thinning in non-transplanted hairs.
Female hair transplant follows the same basic principles, but the patterns are often different. Many women develop diffuse thinning across the top rather than distinct Norwood-style recessions, and donor density can be more limited. Women therefore need particularly careful diagnosis and a tailored plan with very clear, realistic expectations.
0–2 Weeks: Immediate Post-Op
In the first 1–10 days, the transplant area usually looks worse before it looks better.
Redness and small scabs around each graft are common.
Mild swelling of the forehead or around the eyes may appear for a few days.
Tiny crusts form and then fall off over 7–10 days with proper recovery period care.
Most clinics, including Medart, use local anesthesia with or without mild sedation during surgery. Health services such as the NHS explain that serious complications like infection or heavy bleeding are uncommon when proper sterile technique and aftercare are followed in accredited clinics.
2–8 Weeks: Shedding and the "Ugly Duckling" Phase
Between weeks 2 and 8, many transplanted hairs fall out in a process called shock loss.
Shock loss is a temporary shedding of hairs caused by surgical stress in both donor and recipient areas. The AAD describes this as a known phenomenon in hair procedures. Your scalp can look patchier, and sometimes native hairs near the grafts also shed, making the area look thinner than before surgery.
During this phase:
Cosmetic improvement is minimal or negative.
You may see small pimples as follicles heal.
Emotionally, it can feel like a step backwards even though it's normal.
This "ugly duckling" period is when people often worry about hair transplant failure, but at this stage the hair transplant density before after surgery simply cannot be judged yet.
3–6 Months: Early Regrowth
From months 3 to 6, early regrowth begins, often as thin, soft hairs.
● New hairs appear like fine stubble, then slowly thicken.
● Density is uneven; coverage improves, but the result still looks immature.
● Some people feel disappointed if they expected a big change by month 3.
Educational material from ISHRS notes that many patients first see noticeable new growth around 3–4 months, but the real cosmetic shift usually starts closer to 6 months. In our clinic, we reassure patients that a modest, patchy look at this stage is consistent with realistic results.
6–12 Months: Major Visible Improvement
From 6 to 12 months, most people see their biggest visible change.
● Hairs thicken and start to match surrounding texture.
● The frontal area and hairline look fuller, and the crown / vertex improves more slowly.
● Styling becomes easier, and many patients feel more confident in photos and social situations.
Peer-reviewed clinical reviews describe that a majority of transplanted hairs are visible by around 6–9 months, with continued improvement toward 12 months. In our experience at Medart, many patients say months 8–10 are when friends and colleagues first comment that they look younger or "rested".
Your hair transplant density before after this period will depend on how many grafts were placed, how they were distributed, and your hair's thickness, curl pattern, and color contrast with the scalp.
12–18 Months: Final Refinement
Between 12 and 18 months, the transplant matures.
● Any frizz or coarse texture at the hairline softens.
● The crown / vertex often catches up, as this area can lag behind the front by a few months.
● Small asymmetries or areas of relative thinness become clearer, which may or may not justify a revision / repair hair transplant.
A simple timeline summary:
● 0–2 weeks: scabbing, redness, swelling.
● 2–8 weeks: shedding of transplanted hairs (shock loss).
● 3–6 months: early regrowth, patchy density.
● 6–12 months: major visible improvement in density and coverage.
● 12–18 months: final maturity and texture refinement.
For more on healing and daily routines, see our detailed hair transplant recovery timeline.
Understanding this timeline sets realistic hair transplant expectations. Next, we'll connect these stages to different hair loss patterns so you can picture your own potential real hair transplant before and after result.
What Realistic Results Look Like for Different Hair Loss Patterns
Your before and after result depends heavily on your pattern of hair loss, with mild recession often achieving near-full frontal density and advanced baldness usually requiring strategic coverage rather than complete restoration.
The Norwood scale grades male pattern baldness from stage 1 (minimal recession) to stage 7 (extensive loss across the whole top). The same number of grafts can look very different on a Norwood 3 versus a Norwood 6 because the area to cover is so different. Hair characteristics such as curl pattern, color contrast with scalp, and hair shaft diameter further influence how full the result appears.
Here is a simple expectation matrix:
Pattern (Norwood) |
Typical Goal |
Realistic Expectation |
|---|---|---|
2–3 |
Hairline |
Very natural, fairly dense front; strong frame |
4–5 |
Front + mid-scalp |
Good framing, softer or thinner crown |
6–7 |
Front focus |
Thin but continuous coverage; often 2 sessions |
As one senior surgeon at Medart often puts it: "In advanced Norwood 6–7 cases, even an excellent donor area usually cannot restore full density across the entire scalp; we prioritize the front and mid-scalp for the biggest cosmetic impact."
Mild Recession (Norwood 2–3): Subtle but Powerful Changes
For a man with Norwood 2–3, recession is mainly at the temples and frontal corners.
A typical plan might use around 1,800–2,800 grafts to:
● Reinforce or slightly lower the hairline.
● Fill in temple recessions.
● Blend with existing frontal hair.
Because the area is small and donor density is usually strong, realistic hair transplant results can look very close to a naturally full front. Under normal indoor light, the scalp may be barely visible through the frontal hair. Under harsh overhead light, some spacing is still visible, but basic styling hides it easily.
Advanced Loss (Norwood 4–5): Framing the Face, Not Perfection
Norwood 4–5 involves recession at the front plus a balding or thinning crown / vertex.
A realistic strategy usually:
● Prioritizes a conservative, age-appropriate hairline design to frame the face.
● Densely packs the frontal third and mid-scalp.
● Provides lighter coverage in the crown, or leaves it for a second surgery.
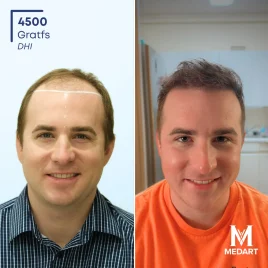
In our experience at Medart, many Norwood 4–5 patients have 3,000–4,000 grafts placed in one session. After 12–18 months, the front and mid-scalp look clearly fuller, while the crown may still show scalp, especially in bright light. The overall effect is more youthful and balanced, but not thick hair everywhere.
Severe Loss (Norwood 6–7): Managing Expectations and Priorities
For Norwood 6–7, the entire top is bald or nearly bald, with only a horseshoe-shaped rim of hair remaining.
Even with strong donor density, total available grafts are limited. The main goals are:
● Build a natural-looking hairline that suits your current age.
● Achieve moderate coverage in the frontal half.
● Accept thinner coverage, or even continued baldness, in the far crown.
Multiple sessions are often needed. A realistic expectation is being able to style hair forward or to the side in the front and mid-scalp, while the crown may look thinner or benefit from very short haircuts or scalp micropigmentation (SMP) for camouflage.
How Hair Type and Color Change the "After" Look
The same graft count can look very different depending on your hair.
Important hair characteristics include:
● Curl pattern: Wavy or curly hair covers more surface area and throws more shadows, improving the illusion of density.
● Hair shaft diameter: Thick, coarse strands provide more coverage than fine strands at the same density.
● Color contrast with scalp: Light hair on light skin, or gray hair on pale skin, hides thinning better than dark hair on pale skin.
The ISHRS and other hair restoration societies repeatedly note that patients with coarse, wavy hair and low color contrast often achieve better visual density with fewer grafts. In our experience at Medart, this pattern is clear across our high-volume Istanbul practice.
If you're unsure which Norwood stage or hair type description matches you, it's wise to get a professional opinion rather than guess.
If you're not sure which pattern you fit into, send a few clear photos via the WhatsApp button in the bottom-right corner. A Medart specialist will identify the closest examples in this guide and give you a free, honest assessment of your likely before and after.
Next, we'll look at why some photos look like miracles and how to tell hair transplant before and after realistic images from carefully staged marketing shots.
Realistic vs "Instagram-Perfect" Before and After Photos
Many hair transplant before and after photos look "too good" because of better lighting, different hairstyles, and camera angles, so you should always compare images taken in similar conditions from multiple views.
Professional groups such as the ISHRS warn patients to be cautious of misleading advertising, including edited or selectively chosen "best case" photos. Understanding how photos can be manipulated helps you avoid unrealistic hair transplant expectations and focus on real hair transplant before and after results instead.
Red Flags in Before and After Galleries
Watch for these red flags when you review a gallery:
● Different lighting: Dim, overhead light in "before" photos and bright, frontal light in "after" photos exaggerate the improvement.
● Different hair length or style: Short, messy, dry "before" hair but longer, styled, product-heavy "after" hair can hide thinning.
● Angles and framing: Distant, top-down "before" photos and close-up, straight-on "after" photos conceal details.
● Wet vs dry: Wet hair clumps and reveals scalp; dry, fluffy hair hides it. Compare wet to wet or dry to dry.
● Heavy use of Photoshop / image editing / lighting filters that blur the scalp, over-smooth the hairline, or change skin tone strongly.
A healthy skepticism is useful. If every result on a website looks like a celebrity with absolutely no visible scalp and no variation between cases, you're probably seeing the top 1% of outcomes, not typical, realistic results.
What Ethical, Realistic Results Photos Should Show
Ethical, realistic results galleries usually include:
● Consistent lighting, background, camera distance, and hair length in all pairs.
● Multiple angles: front, both profiles, top, and back/crown views.
● Close-ups of the hairline, temples, and crown / vertex showing individual hairs.
● Clear labels with technique, graft count, and months since surgery.
You can also see how celebrity procedures differ from everyday patients in our piece on how celebrity hair transplants differ from normal patients. Celebrities often have early intervention, strong donors, and professional styling support that most people don't have.
Later in this guide, we'll explain how to use our detailed Turkey hair transplant before and after gallery to assess clinics more realistically. First, let's look at the deeper factors that shape your personal outcome beyond what any photo can capture.
Factors That Shape Your Personal Before and After Result
Your personal hair transplant result is mainly determined by your donor hair supply, your pattern and stability of hair loss, your hair characteristics, and the experience and technique of your surgical team.
Two people with the same Norwood stage can still get very different before and after outcomes. The AAD emphasizes that careful patient selection, donor quality, and surgeon expertise are key determinants of success. Here are the main factors to weigh.
Donor Area: The Real "Budget" Behind Your Result
Your donor area / donor density is often the single most important factor.
● High donor density and thick hair mean more grafts can be harvested safely without obvious thinning.
● Low density or very fine hair limit how many grafts are available before overharvesting makes the back look patchy.
● Scalp laxity (how loose or tight the skin is) affects FUT comfort and how well the linear scar can be closed.
Think of this as your lifetime graft count budget. In our experience at Medart, we sometimes turn patients away or recommend fewer grafts when donor density is low, to avoid hair transplant failure and protect long-term donor health. This kind of careful donor area management is essential for results that still look natural 10–15 years later.
Surgeon and Team Skill: Why Experience Shows in Photos
The experience and philosophy of your hair transplant surgeon / clinic strongly influence outcomes.
Key elements include:
● Hairline design that respects age and aesthetic balance / facial proportions. A very low, straight "teenage" hairline on a 45-year-old almost never looks natural over time.
● Appropriate density units (grafts per cm²) in each zone, balancing the illusion of fullness with the need for good blood supply.
● Graft handling, including keeping follicles hydrated and cool until placement to support survival.
● Precise angle and direction of placement to mimic natural hair growth.
Reviews and consensus statements from hair restoration societies explain that meticulous technique reduces risks such as visible scarring, infection, and poor growth. In a high-volume Istanbul clinic like Medart, surgeons also work with experienced technician teams, which helps maintain quality and consistency across cases.
For more on safety, read our guide to common risks and complications of hair transplant.
Your Role: Healing, Aftercare, and Ongoing Hair Loss
Your choices before and after surgery also shape your result.
● Following washing, sleeping, and activity instructions protects fragile grafts in the first weeks.
● Avoiding smoking and heavy alcohol helps healing because these reduce blood flow to the scalp.
● Managing ongoing androgenetic alopecia with finasteride, minoxidil, or other therapies recommended by your doctor helps preserve non-transplanted hairs.
Potential complications to discuss with your surgeon include:
● Infection at donor or recipient sites.
● Excessive scarring, including raised or stretched FUT scars or visible FUE dots.
● Prolonged shock loss or true hair transplant failure, where many grafts do not grow.
Major health bodies like the NHS and AAD describe these problems as uncommon in accredited clinics, but they can happen. Systemic health issues such as uncontrolled diabetes or bleeding disorders can increase your risk, so a full medical history and personalized assessment with a specialist is essential.
Adjunctive treatments such as PRP (Platelet-Rich Plasma) injections are sometimes used to support healing and growth. Long-term medical therapy must always be prescribed or supervised by a doctor, because drugs like finasteride and minoxidil can have side effects and aren't suitable for everyone.
Next, we'll translate these clinical factors into what a "good" result actually feels like in everyday life, beyond the photos.
Setting Healthy Expectations: How "Good" Results Actually Feel
Even with an excellent hair transplant, you'll still see some scalp under strong light or with very short haircuts, but most patients feel significantly more confident about how they look day to day.
A successful result is best defined as a natural-looking hairline + clear improvement in coverage + satisfied patient, not total invisibility of scalp in every possible lighting condition. Surveys summarized by the ISHRS suggest that most patients who receive clear, evidence-based counseling beforehand are satisfied or very satisfied with their results.
Everyday Reality: Mirrors, Photos, and Lighting
In daily life, "good" usually means:
● You feel comfortable in mirrors, video calls, and casual photos without obsessively hiding angles.
● You can style your hair without elaborate tricks to cover every gap.
● Under harsh downlighting, or when hair is wet, some scalp still shows, especially in the crown.
The psychological impact / self-esteem improvement can be significant when expectations are aligned with reality. Many patients in our Istanbul practice say they feel like themselves again, even though they know they don't have their teenage hair back.
When a Second Procedure or Medical Therapy Makes Sense
A second procedure or additional treatments may be appropriate when:
● You had severe loss (Norwood 6–7) and planned a two-stage strategy from the start.
● Ongoing hair loss has created new thinning behind transplanted areas.
● You want to refine the hairline or add a little more density where donor reserves allow.
Adjunctive options, guided by a dermatologist or hair surgeon, can include finasteride, minoxidil, PRP injections, or non-surgical options such as hair systems or SMP. Your doctor can help you decide what to expect after hair transplant and whether another surgery or non-surgical approach is in your best interest.
From here, let's bring these ideas to life with real-world case examples from an Istanbul clinic, so you can picture a range of realistic outcomes.
Real Case Scenarios from an Istanbul Hair Transplant Clinic
Real-world cases from a high-volume Istanbul clinic show that outcomes range from subtle improvements to dramatic changes, depending on the starting point, graft numbers, and long-term planning.
The following anonymized examples are based on actual patients treated at Medart Hair Transplant in Istanbul. They illustrate how hair transplant Turkey results can look in everyday practice, from striking transformations to modest but worthwhile changes and a repair hair transplant case. If you'd like context on pricing decisions, see how hair transplant cost in Turkey relates to quality and results.
Case 1: 32-Year-Old Norwood 3, 2,800 Grafts to the Hairline
This patient had straight, medium-thick dark brown hair and Norwood 3 recession at the temples and frontal corners.
● Plan: FUE, about 2,800 grafts to reinforce and slightly lower the hairline and fill temples.
● Before: Clear M-shaped hairline with visible scalp at the corners, but strong mid-scalp and crown.
● After (12 months): Dense, natural-looking hairline, with no obvious transition between transplanted and native hair in normal indoor light.
Under strong downlighting, mild spacing is visible, but a simple forward style covers it. He reported feeling like he "never went bald" when looking straight on — a striking yet still realistic outcome for his pattern and donor quality.
Case 2: 45-Year-Old Norwood 5, 3,500 Grafts Front + Mid-Scalp
This man had wavy, coarse, light-brown hair with good donor density but significant frontal and mid-scalp thinning and a small bald crown / vertex.
● Plan: FUE, about 3,500 grafts to the frontal third and mid-scalp, with a conservative, age-appropriate hairline.
● Before: Deep recession, see-through frontal and mid-scalp, visible bald spot at the crown.
● After (15 months): Strong improvement in the frontal half; under indoor light, scalp is barely visible through the front, while the crown remains thinner.
He generally styles his hair forward, which frames his face well and draws attention away from the crown. This is a modest but worthwhile result: not full coverage everywhere, but a major improvement in how old he appears and feels.
Case 3: 52-Year-Old Norwood 6, Two-Session Strategy
This patient had fine, straight, salt-and-pepper hair and extensive loss (Norwood 6).
● Plan: Two FUE sessions of about 3,000–3,200 grafts each, focusing first on front and mid-scalp, then lightly covering the crown.
● Before: Only a narrow fringe remained at the back and sides, with a fully bald top.
● After Session 1 (12 months): Natural but not dense coverage in the frontal half, enough to style hair forward without looking fully bald from the front.
● After Session 2 (24 months): Thin but continuous coverage from front to high crown; under soft indoor light, scalp is visible but the head no longer appears bald.
He described the change as "I look like a man with thinning hair, not a bald man" — a realistic and satisfying goal for many Norwood 6 patients.
Case 4: Repairing an Overpromised, Under-Delivered Result
A 38-year-old man came from abroad after previous FUE surgery at another clinic that promised "full coverage in one day" and "7,000 grafts".
● Problem: Patchy, pluggy hairline, very thin crown, and clear overharvesting in the donor area with visible white dots. Many grafts had apparently failed to grow, indicating poor growth and true hair transplant failure.
● Repair plan at Medart: About 1,800 FUE grafts carefully harvested from remaining scalp donor plus limited beard or body hair transplant to soften the hairline and fill strategic gaps only.
● After (18 months): Hairline looks more natural and less pluggy; density is still not thick, but overall appearance is far improved. The donor still shows some thinning but is less obvious because we avoided further aggressive harvesting.
Overharvesting here meant the previous clinic removed so many grafts that the donor already looked thin at normal hair length. In our experience at Medart, repair cases like this are common among medical tourism patients who chose very low-cost offers with guaranteed high graft counts and little evidence of medical oversight.
From real cases like these, you can see that outcomes depend on starting pattern, donor reserves, and planning. Next, we'll show how to use what you now know about before and after results to choose a safe clinic, especially if you're considering Turkey or Istanbul.
How to Use Before and After Photos to Choose the Right Clinic
The best way to use before and after photos is to find cases that look like your own hair loss pattern and hair type, then ask the clinic to explain how many grafts were used and what limitations they discussed with that patient.
Choosing a clinic, especially abroad in Turkey or Istanbul, requires more than checking price or a few impressive photos. Turkey performs a very high volume of hair transplants each year, making Istanbul one of the world's major hubs — but quality varies widely between providers.
Step-by-Step: Evaluating Photos and Clinics
1. Match your pattern and hair type. Look for cases with a similar Norwood stage, age range, and hair features (curl, thickness, color).
2. Check the details. Each case should list technique (FUE or FUT), graft count, and months since surgery.
3. Look for a range, not just perfection. Reliable clinics show easy and challenging cases, not only spectacular ones.
4. Ask about limitations. During consultation, ask what constraints they discussed with that patient, such as donor limits or number of sessions.
5. Watch for overpromising clinics. Be cautious if you hear:
● Guaranteed "full head of hair" for very advanced baldness in one session.
● Fixed, very high graft numbers promised without examining your donor area.
● No discussion of risks, aftercare, or long-term donor area management.
● A focus only on price or "deals", with little emphasis on surgeon credentials.
Ethical clinics in Istanbul and elsewhere emphasize accreditation, experienced surgeons, and realistic long-term planning. You can see how we present our own results in our detailed Turkey hair transplant before and after gallery, where we use consistent lighting, angles, and time labels.
If you're considering traveling, our complete guide to having a hair transplant in Turkey covers travel, safety, and planning in more detail.


